Lotus Lamp - Prototype
For this week's homework assignment, we were asked to re-create significant objects from our lives using paper as a sculptural medium. I chose to recreate a lotus lamp I purchased when I was first married (Fig. 1) and incorporate elements from my younger daughter's bedroom sidelight (Fig. 2). I also had in mind Chinese Sky Lanterns (Fig. 3) which are very beautiful and cool and are also constructed of paper as an inspirational guide. The lamp I'm recreating was one of the few emotional splurges with-no-real-purpose I've indulged it. I saw it in Chintz and Company, fell in love with it, and found some way to justify the purchase. Unfortunately, although the design is beautiful, it never fit the style of the rest of the house and has never been properly incorporated into our home. The second lamp was purchased from Urban Barn. They had several different animal lamps and my daughter liked this one the best.
 |
| Fig. 1 Chintz & Co. Lamp (inspiration 1) |
 |
| Fig. 2 Urban Barn Lamp (inspiration 2) |
 |
| Fig. 3 Chinese Sky Lanterns (inspiration 3) |
Armed with the knowledge of building a sphere in Rhino that was provided last week, I created a tear drop shaped 3D model. I originally planned to keep the point at the top, but when I imaged constructing the lamp, I knew this area would be problematic as far as neatly fitting together to prevent light from escaping through cracks, so I cut off the point before construction. I also was interested in insetting the holes in the lamp and constructing these from velum (little sunken boxes of light). The shape I chose was the star shape. Although I created patterns for these, I decided not to include them in this version and to just cover the holes with velum instead.
 |
| Fig. 4 Lamp in Rhino |
 |
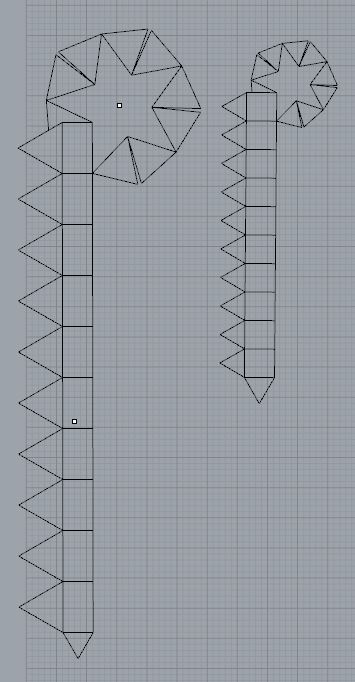
| Fig. 5 Lamp in Rhino Partly Unfolded |
 |
| Fig. 6 Inset Stars in Rhino (not used in prototype) |
 |
| Fig. 7 Lamp Pattern |
 |
| Fig. 8 Star Box Pattern (not used in prototype) |
Since this assignment was to create a prototype that can be refined for the final version, I wanted to experiment with the paper choices. The lamp has a total of 10 "petals". I selected three different patterns of purple/pink paper and constructed 3 petals from each colour choice with the 10th being plain white. I also selected a white velum and a pink dotted velum to cover the stars. I wasn't sure how the star cutouts would integrated with the fold lines of the planar surfaces, so I selected the size and location such that they did not cross any fold lines. I cut the pattern out of the selected paper and started gluing the pieces together. I have used Zig - 2 Way Glue in the past with success, so I decided to use it for this project as well. As I neared model completion, I saw that gluing in the last piece was going to be a bit of a challenge. Luckily, the hole in the bottom of the model was just large enough for me to gain the necessary access to close the sculpture.
 |
| Fig. 9 Paper Lamp with Pattern 1 Paper |
 |
| Fig. 10 Paper Lamp with Pattern 2 Paper |
 |
| Fig. 11 Paper Lamp with Pattern 3 Paper |
Of the three paper choices, I found pattern 2 (Fig. 10) competed too much with the shape of the starred velum holes. My preference is pattern 1 (Fig. 9), although pattern 3 (Fig. 11) would work as well.
I purchased an electronic tealight and placed it in the lamp and closed the lid on the bottom. Fig. 12 and 13 are photos of the lamp with the tealight and a video (not labelled) of the lamp slowly spinning is included after the photos.
 |
| Fig. 12 Paper Lamp with Tealight - Dark Room |
 |
| Fig. 13 Paper Lamp with Tealight - Light Room |
Lighting the lamp allowed better assessment of the star placement, shape, and material choice. I had concerns about the tiny pinprick gaps that are present along the join lines, but fortunately, these weren't apparent once the lamp is lit. Although I had still planned to inset the stars in the final version, I realized doing so might take away from the overall effect. The stars are quite small and too much finicky detail associated with them will likely be distracting. It is also nice to have the stars as quiet details when the lamp is unlit, then come to life with lighting the lamp. The dotted velum did not seem to add anything over the plain velum and if anything, was a distraction. With the constructed version, I realized it would be OK for the stars to cross fold lines as the angle of change is very small from section to section. I might include some larger stars on the lower half of the final version of the lamp. In some cases, the location of the stars conflicted with the tabs used for assembly. I trimmed the tabs so they wouldn't overlap with the stars, but this became more obvious once lit and it would therefor make sense to shift the stars slightly to prevent the conflict. The tabs used to assemble the lamp become obvious once lit. There are several directions I could take to manage this issue as follows:
- accept that the tabs can be seen when the lamp is lit and view them as a design detail
- choose a heavier paper keeping in mind what I learned during prototyping regarding patterns. It is nice to have the entire lamp glow as a result of the thin paper and this would be lost. The end result might still be effective.
- add a strip of paper down each join on the outside of the lamp. The strip of paper would need to be bent in two directions, which might cause obvious buckling of the paper. To avoid this unsightly effect, the strips could be scalloped, reducing/eliminating the problem and adding a nice decorative detail. Alternatively, it might be possible to use some type of decorative tape. This runs the risk of looking tacky
Another issue I experienced was that the end cap had to be pushed slightly inside the lamp for the lamp to sit vertically. There is no real benefit to the cap, so I plan to eliminate this component from the final design.


