Preparation for and Printing of the Final 3D Object
This weeks blog post focuses on working collaboratively with another student to generate new ideas inspired by a mash-up of a selection from the ideas from the Nov 8th post. Each new idea should be inspired by at least two objects, one from each student.
Ben was my partner for this work. He was very easy to work with as he brought great suggestions to the table and was very open to new ideas. Initially, we spent some time talking about what we liked about each others objects then made suggestions about which objects to combine. We divvied up the ideas and shared our files with each other so we could each work on a few of the ideas. Although we could have chosen to sketch the ideas, it seemed just as easy to use Rhino. Our plan was to generate mash-ups, choose a few to print, then choose the most successful of those as our final product.
Below are the results of the mash-ups that completed for our combined work.
Idea 1
I really liked the split in Ben's pyramid and Ben was interested in using the object that looked a bit like a dalek. We decided to create the mash-up of these two images. I added the split in a vertical direction to be sure it would be printable and twisted the split (removing the knobs that touched the split). I believe this is printable, but I am a bit concerned about the angle of the bottom knobs. I think this mash-up made the original shape more interesting. It almost looks like a piece in a machine of some sort.
 |
| Vivian's Abstract Shape |
 |
| Ben's Split Pyramid |
 |
| Idea 1 View 1 |
 |
| Idea 1 View 2 |
Idea 2
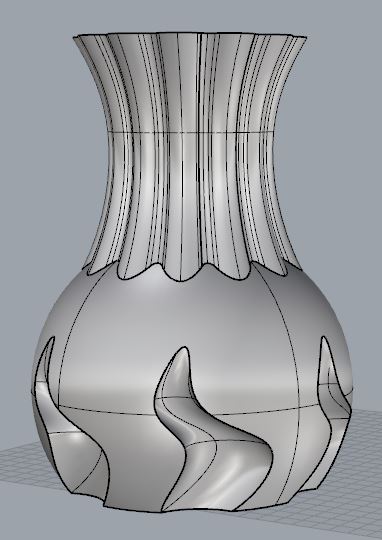
I thought the smooth form Ben created was pretty cool and had a lot of possibilities. By rotating, then combining this form as a negative space to the vase shape, a new object was created that was a well balanced combination of our two ideas. It also looks better than the original vase. I believe this is printable.
 |
| Ben's Organic Shape |
 |
| Vivian's Vase |
 |
| Organic Shape Inverted then Cuddled Up to Vase |
 |
| Shapes Positioned Around Vase Ready to Go - Vase in "Ghosted" View |
 |
| Idea 2 View 1 - Vase Minus the Organic Shape - Rendered View |
 |
| Idea 2 View 2 - Vase Minus the Organic Shape - Coloured View |
Idea 3
Another Idea was to combine one of Ben's abstract shapes with the top of my vase to create a more interesting vase shape. This idea wasn't as successful as the other ideas shown above. The top of my vase had too many dips to fit comfortably on the abstracted base. Although I resized this top several times, it wasn't possible to create a neat fit that fit organically with the base. Below is as good as I could get it and it has a few very short horizontal pieces that makes it questionable that it could be printed. If I could have made it work, I think it would have been more attractive than the original vase. I also tried fitting a different top, one that had a circle as a base thinking the fit would be more successful since the connection point on both shapes are circles. The final result wasn't particularly attractive, although I do think it is an even balance of both ideas and it is printable.
 |
| Ben's Abstract Shape |
 |
| Vivian's Abstract Shape |
|
| Vivian's Vase |
 |
| Idea 3 View 1 - Coloured View |
 |
| Idea 3 View 2 |
Idea 4
Ben noticed I used a lot of twisting in my objects. This inspired the idea below.
 |
| Idea 4 View 1 |
 |
| Idea 4 View 2 (looks a bit like a dinosaur) |
 |
| Idea 4 View 3 |
Idea 5
Originally, were we going to take one of my other objects based on an octagon shape, then twist it will reducing the number of sides with each twist. This was how one of Ben's objects were made and his was very effective. This idea was attempted, but wasn't as visually impactful as we had anticipated so it is not included in this post.
Printed Object
We decided to print idea 2 as that seemed to meet the requirements of the assignment and was a good collaborative mix of both our ideas. Below are some photos of the final product.
 |
| Final Object - Still in Printer |
 |
| Top View of Object so the Texture on the Inside is Visible |
 |
| Top View of Object |
 |
| Side View of Object |
We are also planning to print off one more object although the requirements for this homework assignment have been met. The additional object will be added to the post once printed.
Overall, I've enjoyed this assignment. It was fun working with a collaborator and cool to print off a 3D object. The printer is a bit more sensitive that what I might have assumed, so that was good learning.


No comments:
Post a Comment